Необходимость использования ультрафиолетового света может
возникать не только в различных специфических областях промышленности, но и в
быту. Так, без УФ фонарика не обойтись, если необходимо проверить денежные
купюры на подлинность, обнаружить различные загрязнения биологического
происхождения (например, мочу животных), выявить место утечки хладагента в
автомобильном кондиционере и так далее.
Однако далеко не у каждого имеется ультрафиолетовый фонарь,
а его покупка ради использования несколько раз в год, безусловно, не может
считаться целесообразной. Но не стоит расстраиваться, ведь при необходимости
сделать UV фонарь в домашних условиях не составит труда.
Делаем ультрафиолетовый фонарик из телефона
Сделать фонарик невидимого УФ диапазона своими руками невозможно. А вот видимого (со спектром в районе 395нм-420 нм) очень даже легко
из обычного имеющегося у каждого смартфона, для чего можно воспользоваться
одной из многих видео инструкций.
Чтобы сделать такой фонарь из смартфона
понадобиться прозрачный скот, а также маркеры синего и фиолетового цвета.
Дальнейшая инструкция очень проста:
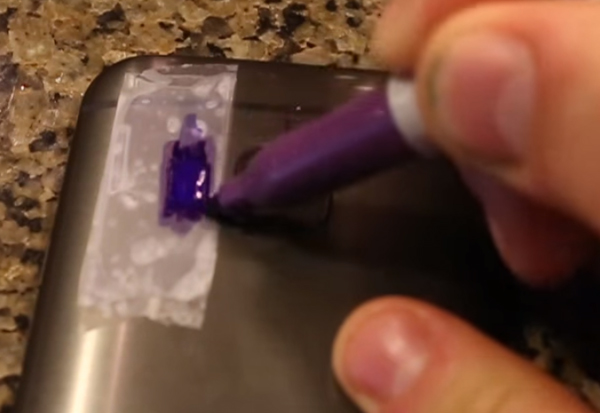
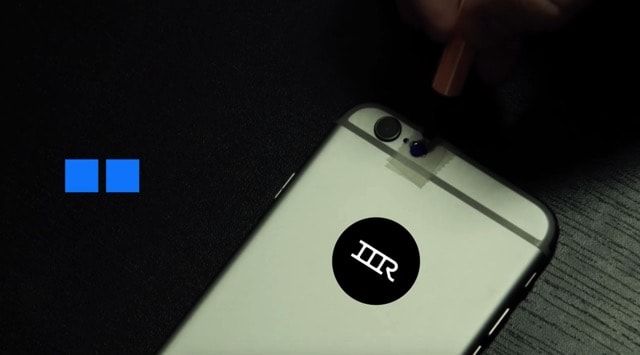
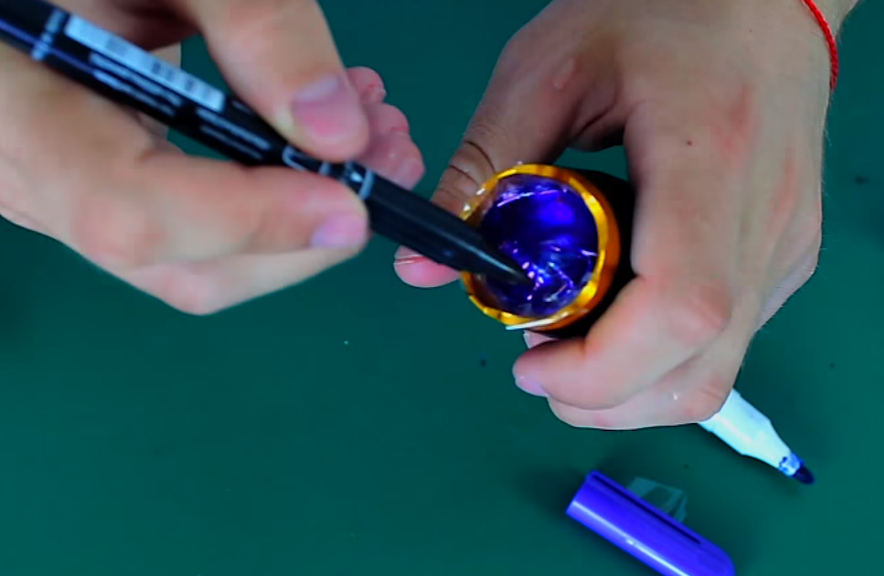
- сначала необходимо заклеить
вспышку телефона прозрачным скотчем, а затем закрасить его синим маркером; - наклеить второй слой скотча и
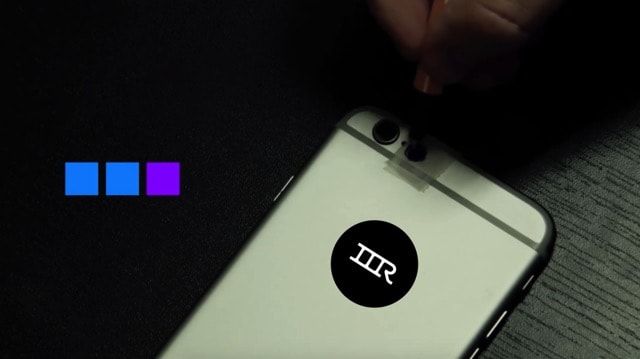
повторить операцию; - наклеить третью полоску скотча и
закрасить уже маркером фиолетового цвета.
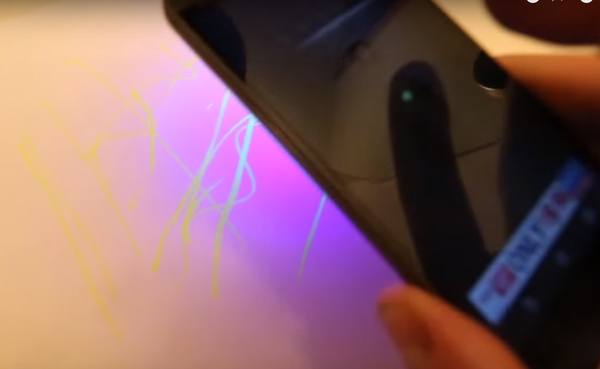
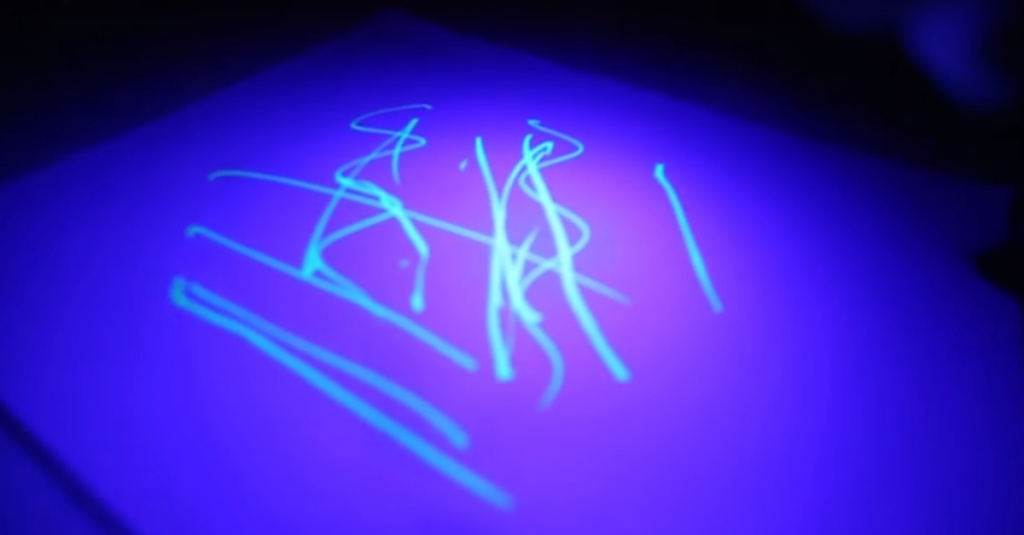
Чтобы проверить работоспособность сделанного устройства,
достаточно написать что-либо флуоресцентным маркером на бумаге или другой
поверхности и включить фонарик.
Как переделать обычный фонарик в ультрафиолетовый
Самый правильный вариант — в качестве донора использовать светодиодный фонарь с белым светом. Далее, в магазине купить UV светодиод необходимого спектра (лучше всего, чтобы это было 365 нм) и заменить белый на него.
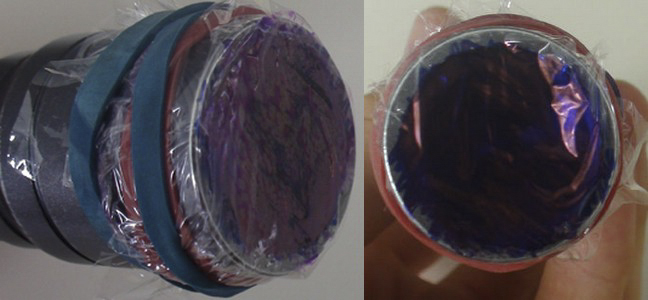
Второй способ, более сомнительный, со светофильтром. Так же можно использовать
обычный белый ручной фонарь с головной частью подходящего размера. Для изготовления примитивного светофильтра в таком случае подойдет широкий
скотч или же обычный гладкий прозрачный полиэтилен.
Как видно, сделать УФ фонарь самому достаточно просто.
Однако стоит напомнить, что такой фонарик будет светить в приближенном к видимому
диапазону спектре (395нм и выше), поэтому будет иметь ярко выраженную фиолетовую
засветку, которая может забивать флуоресценцию некоторых мелких элементов. А многие другие в таком спектре вообще светиться не будут.
В этом материале мы расскажем о небольшом Hand Made-лайфхаке, при помощи которого буквально за несколько минут вы сможете превратить обычное свечение вспышки смартфона в невероятно шикарный ультрафиолетовый источник света. C помощью него можно получить потрясающие снимки.
Яблык в Telegram и YouTube. Подписывайтесь!
Вы только посмотрите на эту фотографию:

Она выполнена без какой-либо программной обработки и долгих настроек цветопередачи в графических редакторах. Весь секрет заключается в небольшом лайфхаке, которым вы можете воспользоваться прямо сейчас.
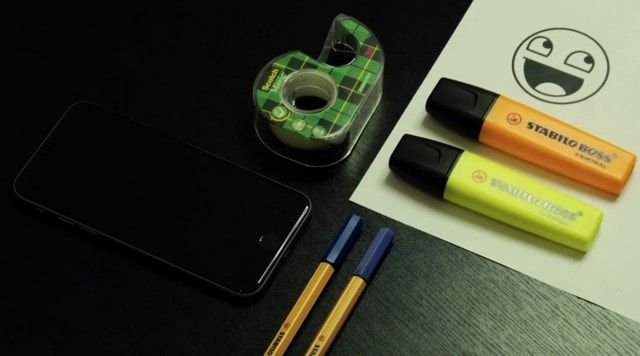
Нам понадобится:
- прозрачный скотч;
- ножницы;
- маркеры синего и фиолетового цвета;
- смартфон со вспышкой.
ПО ТЕМЕ: Как включить вспышку (фонарик) при звонках и уведомлениях на iPhone и какие изменения функция получила в iOS 10.
Как получить фотографии с эффектом ультрафиолетового свечения?
1. Заклейте вспышку небольшим квадратиком прозрачного скотча.
2. Закрасьте область диода синим маркером.
3. Наклейте еще один слой скотча и повторите процедуру также при помощи фломастера синего цвета.
4. Последний третий слой скотча закрасьте уже фиолетовым маркером.
Готово.
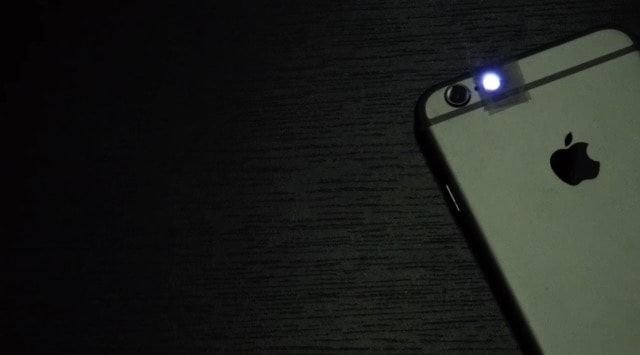
Теперь останется поместить интересующее изображение в темную комнату и сделать фото с модернизированной вспышкой. Конечно, это не настоящее ультрафиолетовое излучение, но изображения получаются максимально эффектными и привлекательными.
Смотрите также:
- Как сделать фото во время записи видео на iPhone и iPad.
- Как правильно фотографировать: 5 простых советов для тех, кто хочет улучшить качество своих фотографий.
- Приложение FaceApp для iPhone состарит фото, добавит улыбку, изменит пол.
Пожалуйста, оцените статью
Средняя оценка / 5. Количество оценок:
Оценок пока нет. Поставьте оценку первым.
Метки: iFaq, Новости Apple, Новости об iPhone.
Добавить комментарий
От обычного фонарика, ультрафиолетовая лампа отличается тем, что в ней отсутствует нить накаливания. Вместо этого используется колба с газом, за счет которой происходит свечение.

Сейчас такие лампы применяются не только в специфических сферах, таких как медицина или криминалистика. Ультрафиолетовые фонари используются и в бытовых целях, например, для проверки на подлинность денежных купюр.

Содержание
- Особенности УФ-фонарика
- Преимущества
- Классификация
- Зачем нужен УФ фонарик — области применения
- Схемы подключения УФ
- Инструкция как сделать УФ фонарь своими руками
- Делаем ультрафиолетовый фонарик из телефона
- Как переделать обычный фонарик в ультрафиолетовый
- Проверка работоспособности фонарик
- Стоит ли тратить время
- Чем заменить УФ фонарик
Особенности УФ-фонарика
В ультрафиолетовых лампах электрическая энергия преобразуется в кинетическую. К главным особенностям таких ламп можно отнести следующее:
- Мощность не теряется.
- Долгий срок эксплуатации.
- Высокая энергоэффективность.

Важно отметить, что УФ-фонарики могут быть не только газоразрядными, но и светодиодными. Такая разновидность находится в свободной продаже в интернет магазинах. При желании можно найти модели любого размера и дизайна.
Преимущества
Если говорить об ультрафиолетовых лампах специфического назначения, то они отлично справляются с удалением бактерий и микроб в воздухе. Достаточно включить лампу и покинуть помещение на некоторое время.
Что касается обычных LED-фонариков с ультрафиолетовым свечением, они помогают вычислить поддельные денежные купюры.

Также относительно недавно появились ультрафиолетовые лампы для маникюра, которые значительно упрощают процесс покраски ногтей.
Классификация
Ультрафиолетовые лампы классифицируются по нескольким признакам:
- Срок службы.
- Мощность.
- Стационарные или мобильные.
- Озоновые или безозоновые.
- Способ получения ультрафиолетового излучения.

Открытые лампы применяются для кварцевания помещений. При этом люди должны в этот момент отсутствовать в комнате. Если используется фонарь с закрытой системой, люди в момент его работы могут находиться в комнате.
Зачем нужен УФ фонарик — области применения
Область применения ультрафиолетовых фонариков достаточно широкая. Промышленные приборы УФ излучения используются в медицинских учреждениях.
Также могут применяться на фармацевтических производствах и даже в сельском хозяйстве. Используется ультрафиолет и для очистки воды в аквариумах. Все это позволяет уничтожить вредоносные бактерии в воде.

Нашлось применение ультрафиолетовым лампам и в косметологии. Сейчас широко распространены устройства с УФ свечением, благодаря которым можно сделать качественный маникюр. Ультрафиолетовые сушилки могут быть как с лампами, так и со светодиодами.

На многих торговых площадках можно найти небольшие фонарики, которые излучают ультрафиолетовый свет. В таких устройствах используются светодиоды. Как правило, предназначаются они для бытового применения.
Схемы подключения УФ
Сделать светильник с ультрафиолетовым излучением достаточно просто. Из проводов потребуется сделать электрическую цепь. Для этого потребуется подготовить подставку и основу.

Люминесцентная лампа ДРЛ-250 отлично подойдет для УФ-излучения. За основу можно взять термостойкий пластик.
Инструкция как сделать УФ фонарь своими руками
С помощью подробной инструкции, каждый желающий может собрать ультрафиолетовый фонарь своими руками.
Делаем ультрафиолетовый фонарик из телефона

Даже из обычного мобильного телефона можно сделать УФ-фонарик. Потребуется прозрачный скотч и фиолетовый фломастер.

Небольшой кусочек скотча приклеить на вспышку камеры телефона, закрасить маркером.
Повторить эту процедуру еще два раза, после чего ультрафиолетовый фонарик будет готов к использованию.
Как переделать обычный фонарик в ультрафиолетовый
Потребуется фонарь на светодиодах, который светит белым светом. В магазине найти UV светодиод 365 HM и установить его вместо белого. Вот так можно очень просто превратить обычный фонарик в ультрафиолетовый.

Вот что необходимо сделать:
- Взять разборный фонарик с шестью белыми светодиодами.
- Приобрести в магазине такие же шесть светодиодов, но только с УФ-свечением.
- Защитное стекло извлечь.
- Аккуратно отпаять светодиоды.
- На место прежних светодиодов установить ультрафиолетовые диоды.
- Собрать фонарик.
Можно попытаться создать светофильтр, который по свечению достаточно схож с ультрафиолетовым. Целлофановый пакет или пленку, натянуть на обычный светодиодный фонарь и закрасить фиолетовым маркером. Затем повторить эти же действия.

Также можно попытаться сделать в домашних условиях настоящую ультрафиолетовую лампу. Для этого нужно подготовить ртутную лампу, мощностью не менее 125 Вт.
Еще потребуется поджигающий дроссель, патрон для цоколя, тряпка, молоток фанеру или пластик (используется для основы).
Теперь нужно выполнить следующие действия:
- Лампу обернуть плотным материалом.
- С помощью молотка аккуратно разбить верхнюю стеклянную оболочку. Важно при этом не разбить внутреннюю трубку. Внутри содержится ртуть, поэтому необходимо проводить все манипуляции на улице.
- Цоколь с трубкой вытащить, очистить от осколков.

- Все осколки необходимо правильно утилизировать, так как в них содержится ртуть.
- Стеклянную трубку нужно вытащить из цоколя. Именно она и станет основой самодельной лампы.
- Трубку необходимо тщательно протереть спиртом. Для этого можно использовать чистую ткань или ватный диск.
- На трубку надеть защиту от любой старой лампы.
- На основе (термостойкий пластик) закрепить поджигающий дроссель и установить патрон.
Остается только подсоединить провода для подключения к сети, и подсоединить трубку к патрону.
Проверка работоспособности фонарик
После изготовления ультрафиолетового фонаря своими руками, его необходимо проверить на работоспособность. Для этого нужно подключить лампу к электрической сети. После всех проделанных манипуляций можно получить лампу для кварцевания помещений.

Такое устройство способно уничтожать болезнетворные бактерии в комнате. Но перед использованием важно помнить, что включать устройство нельзя, если в помещении находятся люди или животные. После самой процедуры кварцевания, необходимо тщательно проветрить комнату.
Стоит ли тратить время
В первую очередь нужно отметить, что изготовление фонарика УФ свечения не несет никакой экономии, но при этом занимает достаточно много времени. Такое занятие подойдет тем, у кого очень много свободного времени и хочется поэкспериментировать.

Но если все же решиться на такой эксперимент, и попытаться создать УФ фонарь в домашних условиях, все необходимые детали можно приобрести в магазине, они находятся в свободной продаже.
Чем заменить УФ фонарик
Иногда пользователи задаются вопросом, чем заменить ультрафиолетовую лампу. Если УФ фонарь используется для освещения в теплицах, можно смело заменить ультрафиолет на флуоресцентное освещение.

Необходимо отметить, что сейчас используются наиболее безопасные амальгамные лампы, которые применяются для уничтожения бактерий.
При подключении к электричеству, прибор издает ультрафиолетовое свечение. В такой разновидности гораздо меньше ртути, поэтому они считаются более экологичными.
Ультрафиолетовый фонарик на телефон
Содержание
- 1 Описание для Фонарик УФ свет симулятор
- 2 Фонарик УФ свет симулятор 1.2 Обновить
- 3 Фонарик УФ свет симулятор Tags
- 4 Additional Information
Ультрафиолетовый фонарик — вещь полезная и забавная. Конечно, искать улики или следы крови в темноте большинству из нас не приходится. Но для сюрприза с заранее подготовленной светящейся надписью или доброй шутки над друзьями он всё равно сгодится. Однако только ради этого покупать прибор никто не будет. Трюк, показанный здесь, позволит кому угодно воспользоваться своеобразной имитацией ультрафиолетового фонаря с помощью обычного смартфона. Тебе понадобится два перманентных маркера — синий и фиолетовый, немного липкой ленты и 3 минуты времени. С такой безвредной и забавной модификацией справится даже ребенок!
Видео на следующей странице:
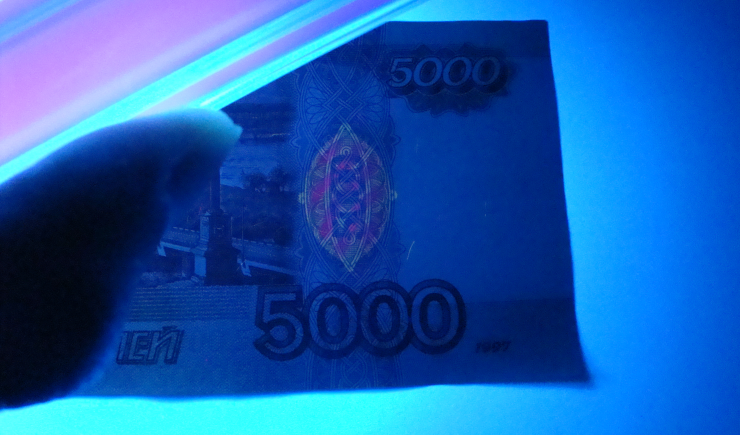
Любой смартфон можно превратить в ультрафилетовый детектор, с помощью которого видны незаметные невооружённому глазу загрязнения и водяные знаки на денежных купюрах. Для этого понадобится смартфон (обязательно со вспышкой), скотч и два фломастера или маркера — синий и фиолетовый. Наша задача — сделать фильтр, который будет отсеивать все цвета, кроме диапазона, в который входит ультрафиолет.
Наклейте на вспышку смартфона небольшой отрезок скотча и закрасьте его синим маркером. Наклейте ещё один и покрасьте фиолетовым. Повторите ещё раз — один слой с синей краской и один с фиолетовой. Сверху можно наклеить прозрачную ленту для защиты. Используйте обычный скотч, поскольку малярный не подойдёт, он не пропускает ультрафиолет.
Включите вспышку (например, с помощью фонарика или камеры) и посмотрите, работает ли сканер. При включенной вспышке в темноте будут светиться определённые цвета (белый и флоресцентные, хорошо поглощающие ультрафиолет). Имейте в виду, что при ярком дневном освещении увидеть флуоресцентные следы намного труднее, чем в темноте.
С некоторыми смартфонами такой трюк не сработает. Дело в том, что не у всех светодиодных вспышек достаточно широкий спектр света, некоторые из них физически не способны светить в UV-диапазоне.
Ультрафиолетовый сканер также можно сделать из обычного фонарика. Принцип тот же самый — сочетать слои плёнки, закрашенной синим и фиолетовым. При наличии краски можно обойтись без скотча: покрасьте стекло фонарика или сменный фильтр из прозрачного материала синим цветом, дайте подсохнуть и нанесите фиолетовый слой. Сменный фильтр можно использовать и со смартфоном, разместив его вплотную поверх вспышки.
Описание для Фонарик УФ свет симулятор
Фонарик УФ свет симулятор 1.2 Обновить
Фонарик УФ свет симулятор Tags

By adding tag words that describe for Games&Apps, you’re helping to make these Games and Apps be more discoverable by other APKPure users.
Additional Information
Категория:
Последняя версия:
Дата публикации:
Получить:
Требования:
Жаловаться:
Фонарик УФ свет симулятор
Обновлено: 2016-11-15
Требуется Android: Android 4.0+ (Ice Cream Sandwich, API 14)
Подпись: fbc20ad5b098496c8b2230fcf077244c87f51f79
Screen DPI: 160-640dpi
Architecture: universal
Файл SHA1-хэша: 28f908157d63e3cbf05b377e0869176621080219
Размер файла: 4.3 MB
Что нового:
Фонарик УФ свет симулятор
Обновлено: 2016-09-12
Требуется Android: Android 4.0+ (Ice Cream Sandwich, API 14)
Подпись: fbc20ad5b098496c8b2230fcf077244c87f51f79
Screen DPI: 120-640dpi
Architecture: universal
Файл SHA1-хэша: 02810e1f95cda9d856aac4305ab9ad3bbc271e1a
Размер файла: 3.8 MB
Что нового:
Фонарик УФ свет симулятор
Обновлено: 2016-08-05
Требуется Android: Android 4.0+ (Ice Cream Sandwich, API 14)
Подпись: fbc20ad5b098496c8b2230fcf077244c87f51f79
Screen DPI: 120-640dpi
Architecture: universal
Файл SHA1-хэша: 78bcc617ddd1bde080ba9b6a4c4406a8da01f9b5
What is a blacklight and how do you make one? This is the topic of a recent MacGyver episode in which he quickly creates an improvised blacklight to find hidden messages on a wall. You can watch the scene here—and a disclaimer, I am currently the Technical Consultant for the show. But still, there’s lots a great science in this one little scene.
What is «Blacklight»?
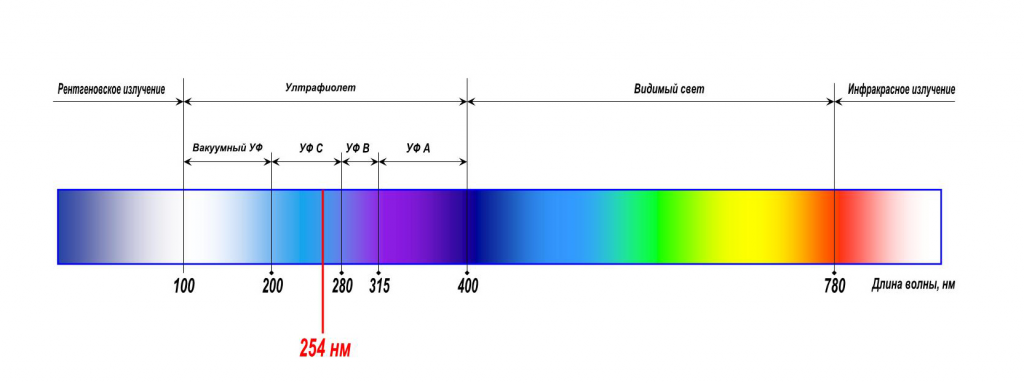
OK, it’s not really a black light. It’s better to call it what it is: ultraviolet light. Let’s start with a quick overview of light. Of course, light is an electromagnetic wave (oscillating electric and magnetic fields), but in this case the frequency is the important aspect. For some narrow range of frequencies, the human eye can detect these waves—this is called the visible spectrum. The lower frequency waves are interpreted by our eyes as the color red, and the higher frequency would be violet.
Here is a picture that might be useful.

Of course, you could break this spectrum of colors into seven parts: red, orange, yellow, green, blue, indigo, and violet. But what the heck is indigo? Really, you could break this into just three colors—red, green, blue—or a thousand colors if you prefer. I tell my students there are seven colors because that’s how many Isaac Newton wanted there to be. Seven is a cool number, and back in Newton’s day there were just seven regular moving objects in the sky: the Sun, Moon, Mars, Mercury, Jupiter, Venus, and Saturn. Fun fact: That’s the same order as the days of the week that are named after these objects. Save that for a party (along with radioactive bananas).
If you combine all of these colors of light together, your brain detects that as white light. If there is no light going into your eye, your brain interprets that as the color black (that’s why a completely dark room looks black). But what about the infrared and ultraviolet on the sides of the spectrum? Their names and placement in the spectrum can be explained by their discovery. In 1880, William Herschel took white light and split it into the rainbow colors with a prism. He found that if he put a thermometer in the section past the red color of light, it would still warm up. There must be some type of light that humans can’t see, but that still heat up the thermometer. Since it was below red, he called it infrared. The same is true for ultraviolet.
What Can You Do With Ultraviolet Light?
Surely you’ve seen a UV light. They used to be popular at parties because they would make some materials on your clothes look like they were glowing. Also, the UV lights are used to detect different materials—like at a crime scene or in an escape room. But how does this work?
The key to a useful UV light is fluorescence. But first, let me just talk electrons in matter. It turns out that electrons in a bound system can only be at certain energy levels. When an electron goes from a higher to lower energy level light is produced. Further, the frequency of this light is proportional to the change in energy levels. This can be written as:

The h is known as Plank’s constant—but that’s not really important right now. Typically an electron will make the quantum leap (see what I did there) from one excited state to the ground state—just one jump making one color of light. However, for some materials, electrons make multiple transitions to ground state. For each transition down, they produce light—different frequency light. So here’s what happens. Some light is incident on the material and this excites an electron. The electron then takes multiple down transitions which produces different colors of light than the one that excited it. This process is called fluorescence.
Of course there’s a catch. In order to get fluorescence to work, you have to start with a higher frequency light—like violet or ultraviolet. But if you shine this on some materials, it will produce light of lower frequency. UV light in, visible light out.
Here is an example of fluorescing highlighter marker on a wall. If you look with just visible light, you don’t see much. With the lights out and UV light shining on it, the highlighter fluoresces and you can easily see it.

This is actually how a fluorescent light works. For the traditional fluorescent tube lights (and the compact fluorescent lights), an internal gas is excited by accelerating electrons. This excited gas then produces UV light. On the inside of the tube is a white powder coating that is fluorescent. The UV light hits the coating when then fluorescent and produces white light (many different colors mixed together).
Could You Make UV Light With a Flashlight?
Now we finally get to the MacGyver hack. Could you make a UV light with the LED flash on a smart phone? The answer is … maybe. In order to understand this hack, you need to understand how an LED works. The Light Emitting Diode is indeed a diode—a solid state device. The LED produces light in a similar manner to excited electrons in a neon gas tube (you’ve seen these neon signs). However, for the neon light the excited electrons change energy levels at the atomic level. In an LED, the electrons change energy levels in a solid state material. Really, that’s the only difference. But this means that the frequency of light produced from an LED depends on the value of this energy transition. You only get one transition and therefore only one color of light.
Then how do you make a white LED light? They are everywhere, now—but how do they work? Of course you could get a red, green and blue LED and combine them together to make a white light, but that’s not how most of them work. Instead, a white LED is either a violet or ultraviolet LED with a fluorescence material. The LED produces a high frequency light (either violet or UV) and this makes the material fluoresce to produce other colors (lower frequency).

Since this fluorescent material isn’t 100 percent efficient, some of the UV light could pass through and be mixed in with the white light. If you want to take a white LED and get UV light, you just need to block the visible colors while leaving the UV light to pass through. There are some materials—like fused quartz or fluorite that do exactly this and can be used to make some pretty cool UV photographs. But could there be other materials that might do the job? Maybe. In the MacGyver episode, he uses the floppy disk part from inside a 3.5 inch disk (kids these days only know this as a «save icon»). Different floppy disks uses different materials and this round disk could possibly allow UV to pass while blocking visible light.
How about a quick review. Here’s how you make a UV light with a smart phone.
- Start with a smart phone that has an LED light (for the camera flash). You want two things from this light. First, it should be a UV LED with fluorescent material and second it shouldn’t be 100 percent efficient.
- Next find some material that blocks visible light but not UV—this might require some trial and error.
- Turn off the lights. Why? If you don’t the UV light will still fluoresce some stuff that you want to look at, but you won’t be able to tell since there will be all this other visible light reflecting off stuff.
Clearly this won’t work with any old light or material, but it’s at least plausible.
Bonus Experiment
I am going to show you a pretty cool demonstration of fluorescence. All you need are some laser pointers—red, green, and blue (they are at least much cheaper than they used to be). Let me start with the red laser pointer. I’m going to take it and shine the red light on different things I can find. You should see that no matter what you shine this red laser on, you get a red dot.

There should be no surprises with the red laser. You don’t see any fluorescence because the frequency of red light is too low to make these higher energy transitions. But what about a green laser? Take your green laser and shine it around the room. You are looking for things that have a non-green dot on them. In particular, try shining the green laser on orange plastic stuff. This is what you can see.

Notice that for some materials the laser dot isn’t green? Yup, that’s fluorescence. Now for the blue laser with an even higher frequency.

Notice that again the blue laser causes fluorescence—but with a higher frequency light, it can cause the effect in a wider range of materials. Go ahead and look for other materials that cause fluorescence. Use the blue laser since you will be able to find more stuff. You might be surprised to find things like olive oil and some wines will do this.
What is a blacklight and how do you make one? This is the topic of a recent MacGyver episode in which he quickly creates an improvised blacklight to find hidden messages on a wall. You can watch the scene here—and a disclaimer, I am currently the Technical Consultant for the show. But still, there’s lots a great science in this one little scene.
What is «Blacklight»?
OK, it’s not really a black light. It’s better to call it what it is: ultraviolet light. Let’s start with a quick overview of light. Of course, light is an electromagnetic wave (oscillating electric and magnetic fields), but in this case the frequency is the important aspect. For some narrow range of frequencies, the human eye can detect these waves—this is called the visible spectrum. The lower frequency waves are interpreted by our eyes as the color red, and the higher frequency would be violet.
Here is a picture that might be useful.
Of course, you could break this spectrum of colors into seven parts: red, orange, yellow, green, blue, indigo, and violet. But what the heck is indigo? Really, you could break this into just three colors—red, green, blue—or a thousand colors if you prefer. I tell my students there are seven colors because that’s how many Isaac Newton wanted there to be. Seven is a cool number, and back in Newton’s day there were just seven regular moving objects in the sky: the Sun, Moon, Mars, Mercury, Jupiter, Venus, and Saturn. Fun fact: That’s the same order as the days of the week that are named after these objects. Save that for a party (along with radioactive bananas).
If you combine all of these colors of light together, your brain detects that as white light. If there is no light going into your eye, your brain interprets that as the color black (that’s why a completely dark room looks black). But what about the infrared and ultraviolet on the sides of the spectrum? Their names and placement in the spectrum can be explained by their discovery. In 1880, William Herschel took white light and split it into the rainbow colors with a prism. He found that if he put a thermometer in the section past the red color of light, it would still warm up. There must be some type of light that humans can’t see, but that still heat up the thermometer. Since it was below red, he called it infrared. The same is true for ultraviolet.
What Can You Do With Ultraviolet Light?
Surely you’ve seen a UV light. They used to be popular at parties because they would make some materials on your clothes look like they were glowing. Also, the UV lights are used to detect different materials—like at a crime scene or in an escape room. But how does this work?
The key to a useful UV light is fluorescence. But first, let me just talk electrons in matter. It turns out that electrons in a bound system can only be at certain energy levels. When an electron goes from a higher to lower energy level light is produced. Further, the frequency of this light is proportional to the change in energy levels. This can be written as:
The h is known as Plank’s constant—but that’s not really important right now. Typically an electron will make the quantum leap (see what I did there) from one excited state to the ground state—just one jump making one color of light. However, for some materials, electrons make multiple transitions to ground state. For each transition down, they produce light—different frequency light. So here’s what happens. Some light is incident on the material and this excites an electron. The electron then takes multiple down transitions which produces different colors of light than the one that excited it. This process is called fluorescence.
Of course there’s a catch. In order to get fluorescence to work, you have to start with a higher frequency light—like violet or ultraviolet. But if you shine this on some materials, it will produce light of lower frequency. UV light in, visible light out.
Here is an example of fluorescing highlighter marker on a wall. If you look with just visible light, you don’t see much. With the lights out and UV light shining on it, the highlighter fluoresces and you can easily see it.
This is actually how a fluorescent light works. For the traditional fluorescent tube lights (and the compact fluorescent lights), an internal gas is excited by accelerating electrons. This excited gas then produces UV light. On the inside of the tube is a white powder coating that is fluorescent. The UV light hits the coating when then fluorescent and produces white light (many different colors mixed together).
Could You Make UV Light With a Flashlight?
Now we finally get to the MacGyver hack. Could you make a UV light with the LED flash on a smart phone? The answer is … maybe. In order to understand this hack, you need to understand how an LED works. The Light Emitting Diode is indeed a diode—a solid state device. The LED produces light in a similar manner to excited electrons in a neon gas tube (you’ve seen these neon signs). However, for the neon light the excited electrons change energy levels at the atomic level. In an LED, the electrons change energy levels in a solid state material. Really, that’s the only difference. But this means that the frequency of light produced from an LED depends on the value of this energy transition. You only get one transition and therefore only one color of light.
Then how do you make a white LED light? They are everywhere, now—but how do they work? Of course you could get a red, green and blue LED and combine them together to make a white light, but that’s not how most of them work. Instead, a white LED is either a violet or ultraviolet LED with a fluorescence material. The LED produces a high frequency light (either violet or UV) and this makes the material fluoresce to produce other colors (lower frequency).
Since this fluorescent material isn’t 100 percent efficient, some of the UV light could pass through and be mixed in with the white light. If you want to take a white LED and get UV light, you just need to block the visible colors while leaving the UV light to pass through. There are some materials—like fused quartz or fluorite that do exactly this and can be used to make some pretty cool UV photographs. But could there be other materials that might do the job? Maybe. In the MacGyver episode, he uses the floppy disk part from inside a 3.5 inch disk (kids these days only know this as a «save icon»). Different floppy disks uses different materials and this round disk could possibly allow UV to pass while blocking visible light.
How about a quick review. Here’s how you make a UV light with a smart phone.
- Start with a smart phone that has an LED light (for the camera flash). You want two things from this light. First, it should be a UV LED with fluorescent material and second it shouldn’t be 100 percent efficient.
- Next find some material that blocks visible light but not UV—this might require some trial and error.
- Turn off the lights. Why? If you don’t the UV light will still fluoresce some stuff that you want to look at, but you won’t be able to tell since there will be all this other visible light reflecting off stuff.
Clearly this won’t work with any old light or material, but it’s at least plausible.
Bonus Experiment
I am going to show you a pretty cool demonstration of fluorescence. All you need are some laser pointers—red, green, and blue (they are at least much cheaper than they used to be). Let me start with the red laser pointer. I’m going to take it and shine the red light on different things I can find. You should see that no matter what you shine this red laser on, you get a red dot.
There should be no surprises with the red laser. You don’t see any fluorescence because the frequency of red light is too low to make these higher energy transitions. But what about a green laser? Take your green laser and shine it around the room. You are looking for things that have a non-green dot on them. In particular, try shining the green laser on orange plastic stuff. This is what you can see.
Notice that for some materials the laser dot isn’t green? Yup, that’s fluorescence. Now for the blue laser with an even higher frequency.
Notice that again the blue laser causes fluorescence—but with a higher frequency light, it can cause the effect in a wider range of materials. Go ahead and look for other materials that cause fluorescence. Use the blue laser since you will be able to find more stuff. You might be surprised to find things like olive oil and some wines will do this.